I don´t know if it was the relatively boring mission or other circumstances that kept him from participating with more enthusiasm.
April 21 - 17:20.
Its late afternoon in the Lagashkar Valley. The sun is still blazing on
this unusually hot spring-day. The soldiers of Alpha Platoon are already
exhausted, but their command is neither able nor willing to give them a break.
The entire day they´ve been patrolling the area on the southern side of the
river, looking for influx of Taliban into the region that might threaten
Mayasaf. Some unusual activities have been spotted and the troops have been put
on alert.
This evening, more combat patrols are about to be sent out into the
Greenzone to investigate the area and report any enemy activity back to the HQ.
One of these groups is Alpha 2, one of the Squads from Alpha-Platoon
stationed in the area. Their route has already taken them along
a farmroad through clusters small settlements and farming compounds. They´re
halfway back to base when they suddenly come under fire - it´s only light rifle
fire, cracking through the vegetation from one of the treelines, but it means
trouble. After a brief consultation with HQ, Alpha 2 is ordered to push towards
the enemy position to get a better picture of their numbers and enemy activity
in the area.
Their advance behind the treeline leads them towards a number of compounds
surrounded by fields. The enemy is probably hiding somewhere here.
"Your task is to conduct a combat patrol to assess enemy numbers and their
organisation to prepare further steps. Don´t get bogged down into heavy fighting
- and, as usual, don´t harm any civilians. Gather information and get back to
base safely!"
------------------------
Objectives:
-Suffer no KIA
-Assess enemy numbers (Points awarded for every 2 enemy units sucessfully
spotted & PIDed by your soldiers)
-Investigate and mark enemy infrastructure (Points awarded for every
Hot-Spot discovered - destruction is not necessary)
Your Forces:
1x US Infantry Squad
Additional assets requested:
1x medium mortar battery, callsign Wormtooth.
----------------------------
 |
| The Area |
As Taliban player, my task is to prevent the US Teams from advancing too far (which enables them to discover more Hot Spots) while on the other hand keeping my units hidden from him (as he will get victory points for units that are discovered). That way, I decided to play rather defensively, keeping the troops hidden as long as the US troops don´t get close to my Hot Spots [Spoiler warning - only read this if you want to know where the Hot Spots are: Hot Spot locations are at: B4, F6, C9, J8 and H11 according to the map-grid ]
Turn 1
 |
| Orders for Turn 1 |
"Maaan, its soo hot!"
"Stop whining, Jackson!"
"Heh, Welcome to hell..."
"Enough, lets get rollin´! Cpl. Fricks, your team will secure the compound to our right, while we provide cover. Let´s get some smoke on the road to protect us from potential sniper fire from further down the road. Any questions? Okay, then get to work!"
"Wormtooth, this is Alpha 2. We need a smokescreen at grid 041-302."
"Roger that, Alpha. We´re checking your coordinates."
"Load is on the way!"
"3...2...1....Splash"
 |
| Smokescreen from the Mortar Support |
Turn 2
No orders-picture for Turn 2, as it doesn´t reflect what finally happened. Team Blue move towards the white house, while Team Red asks for more smoke but fails its request. Nothing dramatic and not worth the pictures or the space ;)
Turn 3
 |
| Turn 3 - Orders |
Without the cover of smoke, Blue makes its entry into the building while red stays on overwatch. Nothing happens though, until...
"Sarge, I got something! Looks like a plastic bag or something..."
"Careful guys! I want a positive ID on that thing before anyone gets closer to it."
 |
| A strange plastic bag is deposited next to the building... |
"Jackson, give me an assessment of th...."
"Contact!"


"Sarge, that looks like a bag full of weapons. RPGs, AKs... even some old M16s."
"Well, here we go... that´s what we´re looking for!"
So that´s it for my first Hot-Spot. But at this pace, I´m very confident that I can protect the other places, as they are hidden and dispersed.
Turn 4
 |
| This was the plan - but Red is only allowed a Tactical Move when leaving Buildings! They get to the edge of the field |
After the fire died down, Team Blue was kept on the lookout while red began to advance into the courtyard.
Turn 5
 |
| Orders for Turn 5 |
Team Blue advances under the cover of smoke grenades
 |
| Team Blue conceiled by smoke |
As does Team Red.
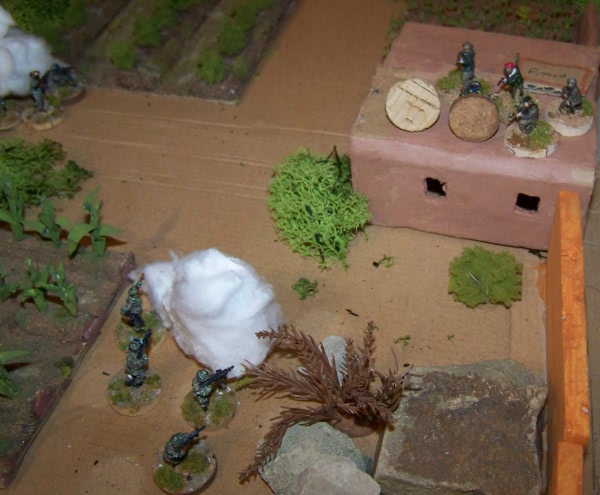
Somewhere along their path towards the house, bullets crack through the air. Someone is shooting from the compound! The soldiers quickly put some rounds into the windows before the full weight of the enemy firepower comes to bear. A young Talib with twitchy trigger-finger has spoiled the ambush his group has set up. Now, the Mujs hunker down and try not to get hit, unable to lay down effective fire on the US Soldiers that are moving closer.
 |
| Team Red detects an ambush! |
 |
| Two Taliban are killed and the rest is pinned! |
Turn 6
No orders picture for this turn, but here are the instructions:
"Blue conceals itself with smoke, while ordering the mortar to fire upon the building containing the hostile forces. The squad will then proceed to secure or destroy the weapon cache near the house.
Meanwhile, Red is put on Overwatch. Use smoke if possible."
Both Blue and Red determine that it might be wiser to save some smoke grenades for later.
 |
| Mortars are ranging in on the enemy position! |
As Blue calls in the Mortar Battery, shells begin raining on the house. The
shells strike dangerously close to the position of Team Red, filling the air
with deadly shrapnel. Fortunately, noone is hit by friendly fire, but neither
does the strike seem to have any effect on the Taliban in the building. After
watching the show, Blue moves back to the weapon cache to secure it.
 |
| Team Blue securing the bag full of weapons |
Meanwhile, Red is still locked in a firefight. Though they kill several
enemies that have resumd their attacks from the houes after the barrage ended,
the resistance is fierce. One of the US Soldiers is hit by incoming fire and the
Team decides that they are too exposed, retreating behind the nearby rocks.
 |
| Bad defense die... |
 |
| ... causing a casualty and a run for cover |
Fortunately, the wounded soldier is still combat effective, though he´ll
definitely require treatment once back at base.
 |
| "Don´t worry, it´s just a fleshwound!" |
On the upside, a casualty transport is organised, which spares the team the
long walk home.
With more time available you could continue the mission longer than
expected before retreating or abort the patrol and head to the rendevous.
"Abort mission, I repeat: abort mission. Disengage and establish a secure
perimeter until the relief arrives. Secure the weapon cache and disable it, if
necessary"
Roger that! Securing perimeter and waiting for evac.
------------
Mission Accomplished.
US
-Suffer no KIA (5 VP)
-Per Hot Spot discovered (2 VP) x1
-Per 2 Units spotted & PIDed (1 VP) x1
Total: 8 VP
Taliban
-Conceil at least 3 Hot Spots from the enemy
(5)
-Per enemy KIA (3)
-Per wounded American Soldier (2) x1
Total: 7 VP
Score: 8:7
COIN generated: 2
COIN expended: 3 (Medium Mortar)
Net COIN Loss: -1
Total COIN score: 74-1 = 73
Though the patrol was able to detect the enemy in the area, information
about their numbers and organisation remain sparse. The patrol was not able
to disrupt the enemy presence in the area in a significant way. However, the
combat experience of your troops indicates that they were up against disciplined
fighters and more resistance might flare up in the area if the enemy is left to
organise himself.
Soo - we´re back on the campaign map for the next turn! Stay tuned for the next turn!
Nice game, and blog! I only do plastic 20mm but still appriciate your figures, they look nice! Good work.
ReplyDeleteThank you, glad you like it!
Delete